Exercise 2 - Vector data via OGC API - Features
OGC API - Features provides a Web API to access vector data (geometries and their attributes). While the core specification covers basic data access and query, additional related standards and extensions are in development for the following capabilities:
- OGC API - Features - Part 1: Core provides basic access and query capabilities
- OGC API - Features - Part 2: Coordinate Reference Systems by Reference enables the import and export of any data according to dedicated projections
- OGC API - Features - Part 3: Filtering adds the ability for complex queries using Common Query Language (CQL2)
- OGC API - Features - Part 4: Create, Replace, Update and Delete (draft) adds transactional capabilities
pygeoapi support
pygeoapi supports all of the above OGC API - Features specification parts (Part 3 is dependent on backend support i.e. Elasticsearch).
Note
See the official documentation for more information on supported vector backends
Note
See the official documentation for more information on CQL support
Next, we are going to explore how-to publish vector data using a GeoPackage.
Publish a GeoPackage
In the previous section we demonstrated the steps involved to add a dataset to pygeoapi and update the configuration. In this exercise we are going to publish another vector file, this time from a GeoPackage (SQLite3) vector data source.
Tip
It may be helpful to open the dataset in QGIS while adding and updating your pygeoapi server to easily evaluate table attributes, names, spatial properties and CRS.
Let's add the file workshop/exercises/data/brazil/guama_river.gpkg.zip:
Update the pygeoapi configuration
First, let's unzip the file guama_river.gpkg.zip to guama_river.gpkg.
Then, open the pygeoapi configuration file in a text editor.
Find the line # START - EXERCISE 2 - flowlines Guama River.
Add a new dataset section by uncommenting the lines up to # END - EXERCISE 2 - flowlines Guama River:
Save the file and restart Docker Compose. Navigate to http://localhost:5000/collections to evaluate whether the new dataset with title "Guama River" has been published.
Note
The SQLite driver incidentally has challenges to open the GeoPackage extension on MacOS. Consult the official documentation or try with an alternative data format. If you use Docker this is not an issue.
OPTIONAL: Publish a GeoJSON file using Elasticsearch
This exercise is optional, if time permits, or you can perform this after workshop.
Here we explore publishing OGC API - Features data using pygeoapi with an Elasticsearch backend provider. For this we need the pygeoapi-examples GitHub repository:
Alternatively, you can download the repo as a .zip file and unzip.
Change into the docker/elastic folder and run the docker-compose.yml file:
If you experience startup problems, consult the README file. You may need to adapt your local host system's virtual memory setting.
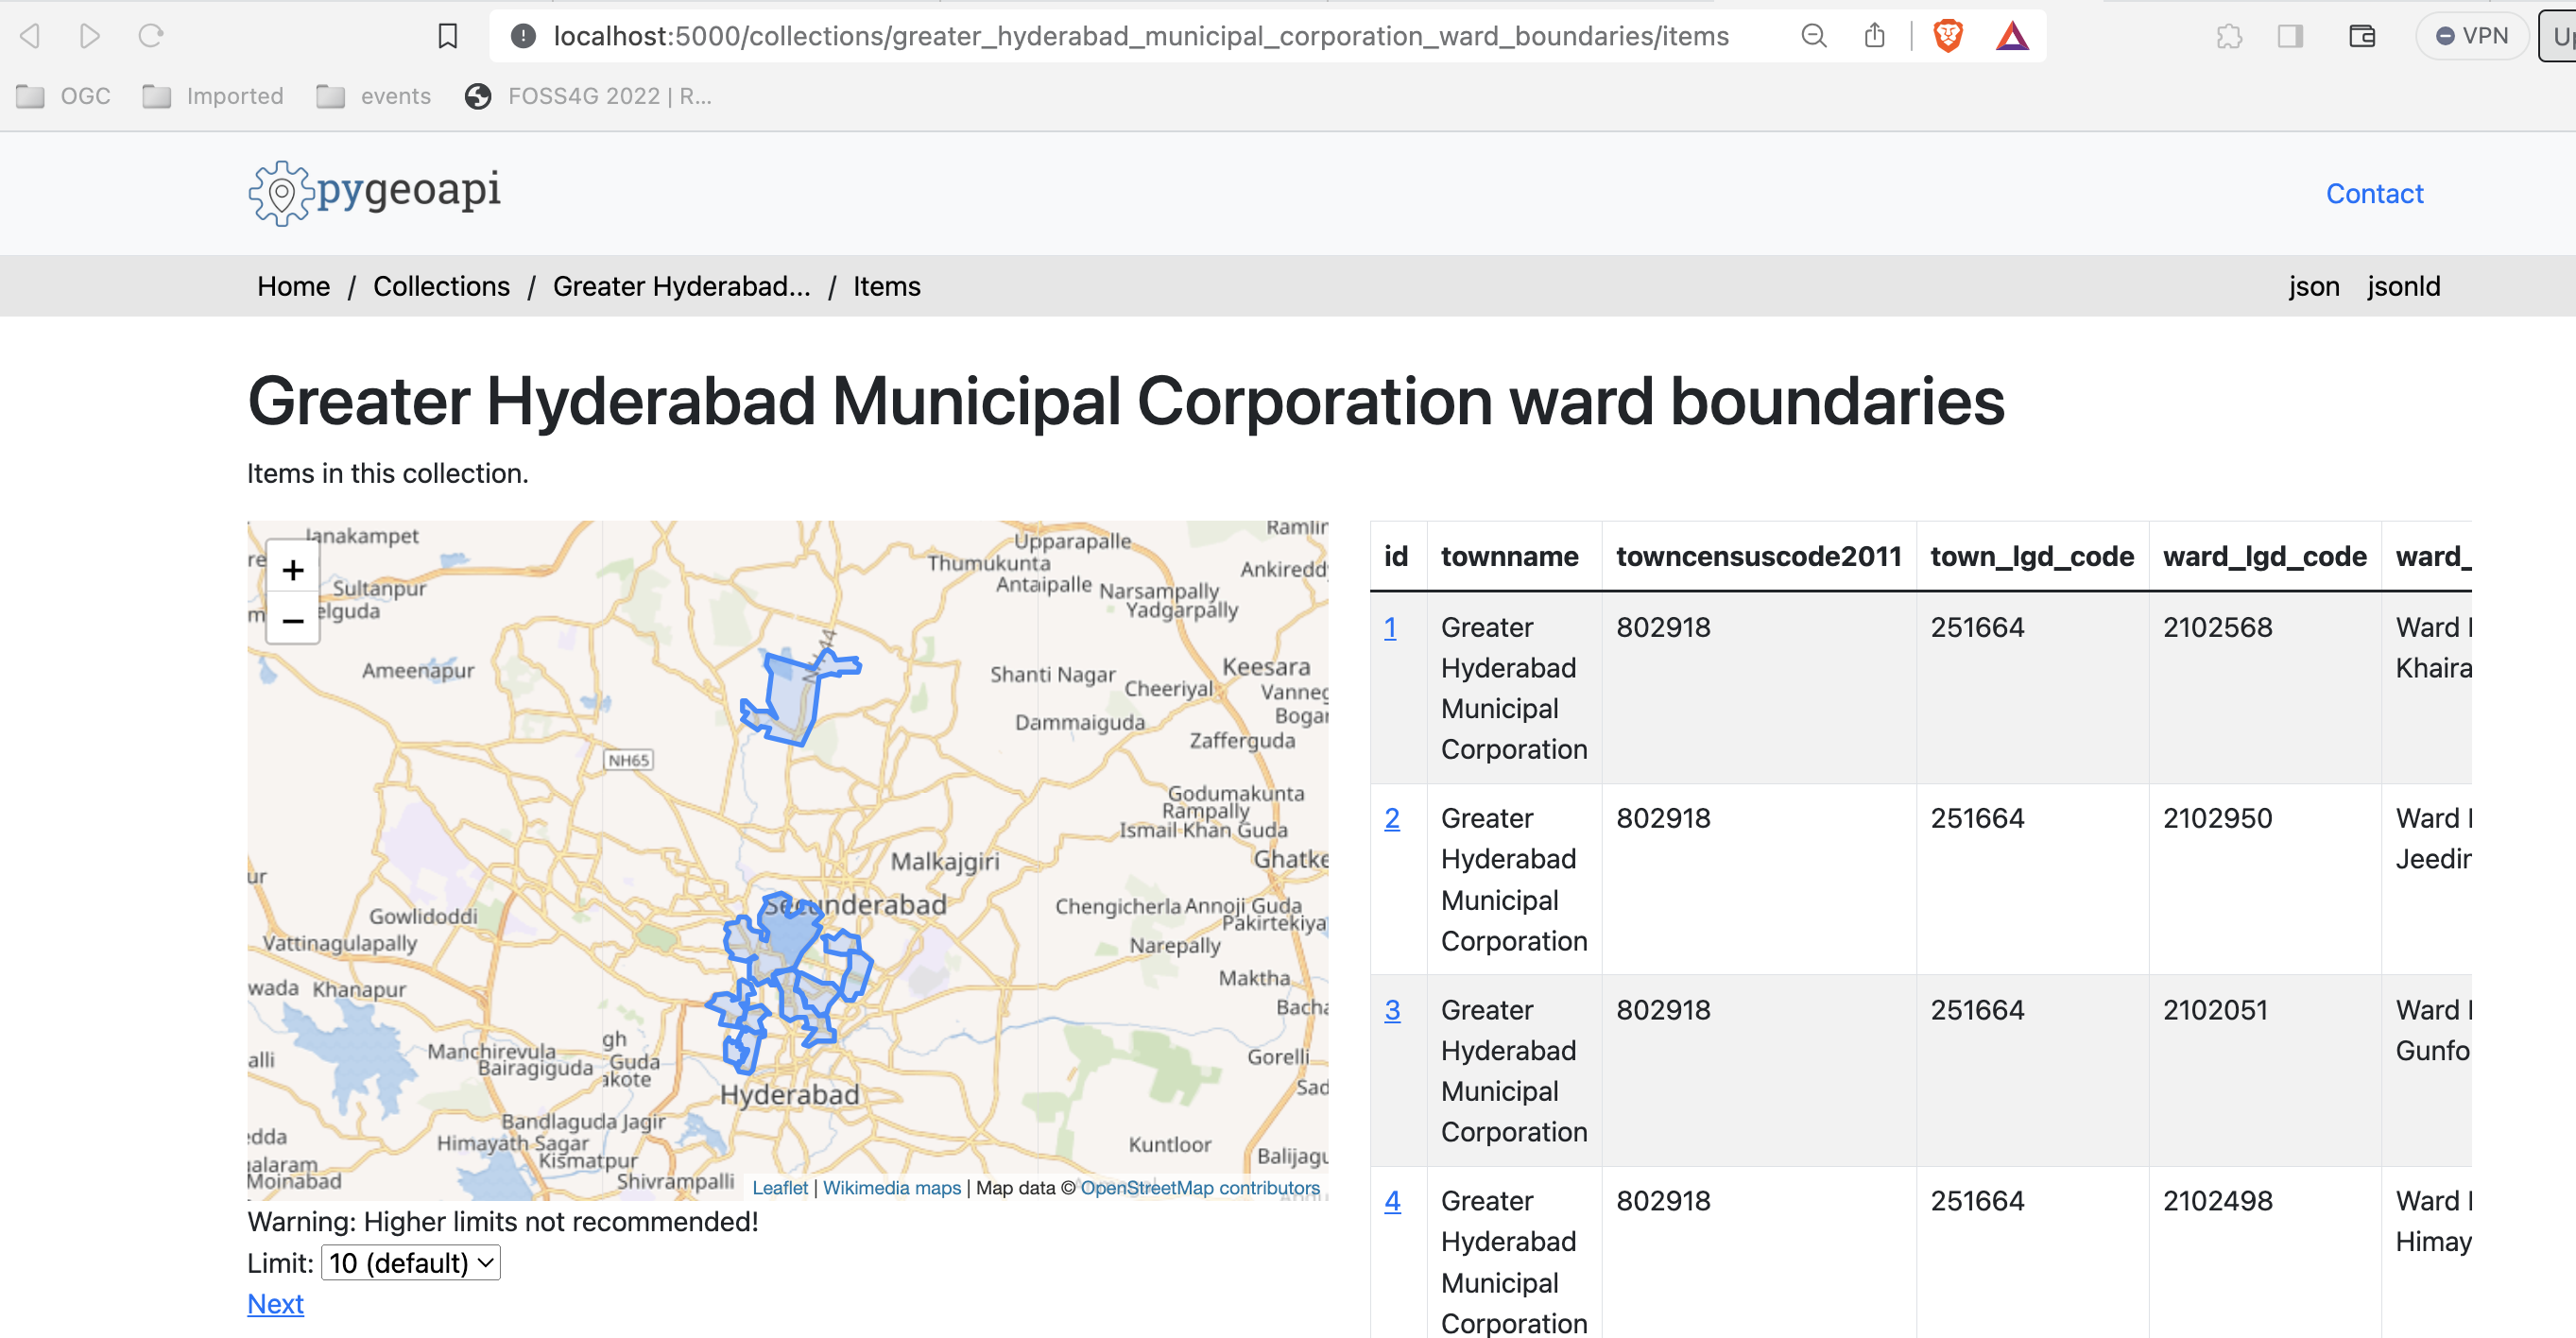
First we will load greater_hyderabad_municipal_corporation_ward_Boundaries.geojson into the Elasticsearch server.
Edit the add-data.sh script within the ES folder, adding these two lines before the end:
greater_hyderabad_municipal_corporation_ward_Boundaries.geojson is downloaded inside the Elasticsearch Docker container and then loaded into Elasticsearch.
After this we need to rebuild the Docker image:
Next we need to configure pygeoapi by inserting the snippet below into the pygeoapi config file pygeoapi/docker.config.yml.
This effectively enables publishing the file greater_hyderabad_municipal_corporation_ward_boundaries.geojson as OGC API - Features
using the Elasticsearch backend provider.
On startup (e.g.: docker compose up -d) the pygeaoapi container will wait until the data has been ingested and the Elasticsearch index has been built. You can check the logs using:
After the server has started you can access the collection page here:
http://localhost:5000/collections/hyderabad
And the feature items here:
http://localhost:5000/collections/hyderabad/items
OPTIONAL: pygeoapi as a WFS proxy
pygeoapi can also function as an OGC API - Features frontend service for an existing OGC WFS through the built-in GDAL/OGR provider. This bridging-function effectively allows you to publish a WFS as OGC API - Features.
This is expanded in an advanced section of this workshop: pygeoapi as a Bridge to other Services WFS-section.
Client access
QGIS
QGIS is one of the first GIS Desktop clients which added support for OGC API - Features. Support has been integrated into the existing WFS provider.
Open an OGC API - Features collection in QGIS
Follow the steps to add some collections from an OGC API - Features enpoint:
- Open QGIS (if you don't have QGIS, you can use OSGeoLive)
- From the Layer menu, select
Add Layer>Add WFS layer - From the
Data source managerpanel, choose 'New connection'
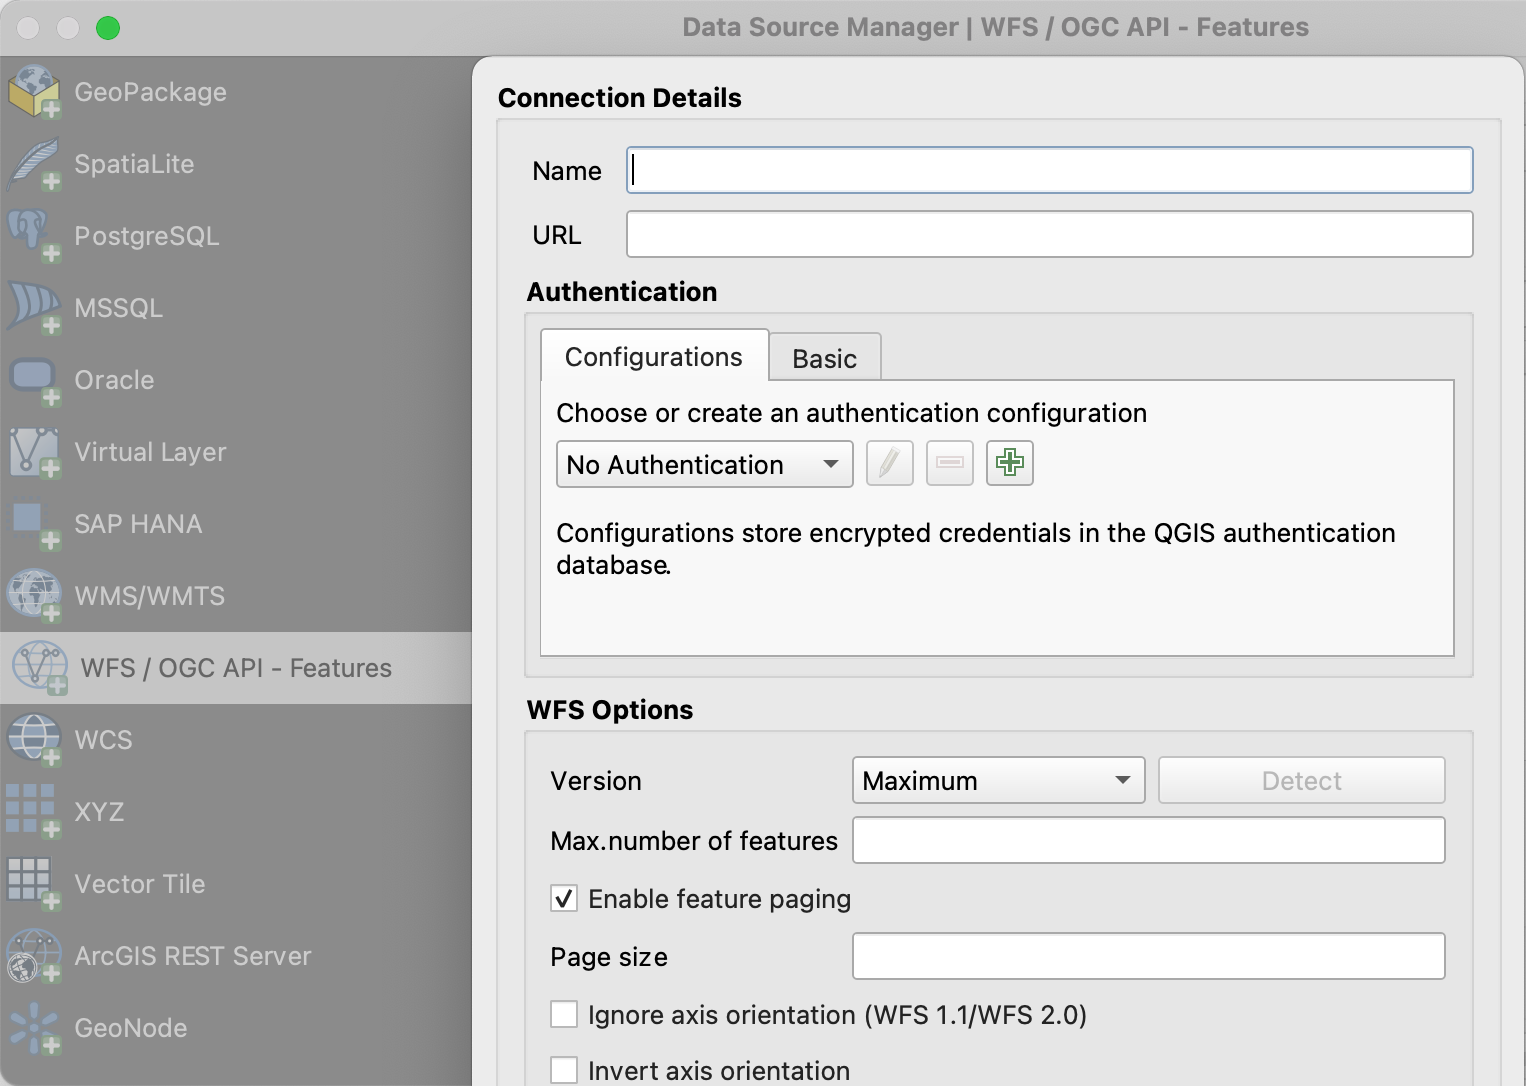
- Add the URL https://demo.pygeoapi.io/master (or the address of a local server)
- You can now click the
detectbutton and QGIS will notice you are configuring an OGC API - Features endpoint - QGIS facilitates to set page size (request is split in multiple requests)
- for points you can easily set it to 2500
- for some polygons with high density, 100 can already be slow
- Press
OKto save the connection and return to the previous screen - Now click the
Connectbutton to retireve the collections of the service
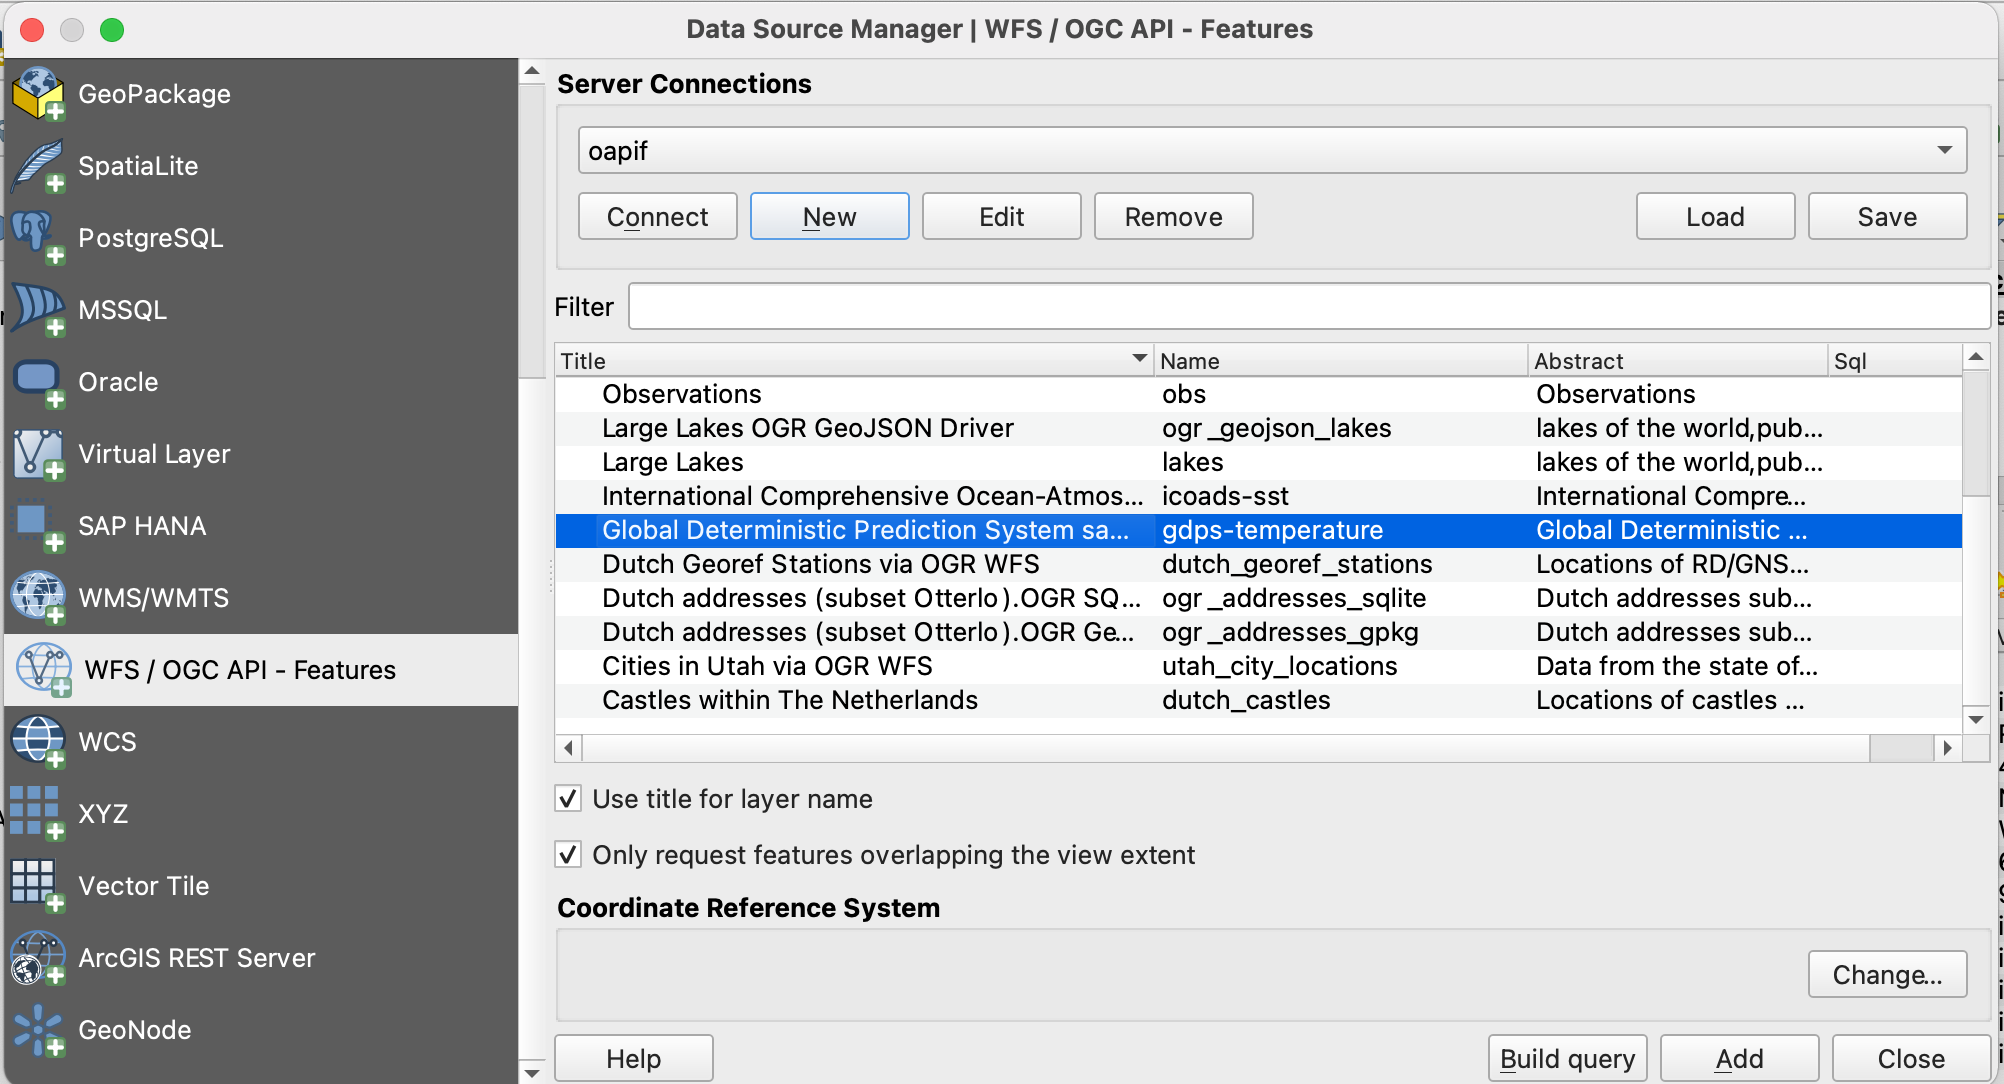
- You can now add collections to your QGIS project
- You can also build a query to add a subset of the collection
- Close the
Data source manager. Notice that QGIS applied a default styling just like it would if you add a file based layer. You can work with the collection in a similar way; identify, apply styling, filter, export, etc.
Tip
Activate the Debugging/Development Tools Panel (right click anywhere on the toolbar icons and select). It will display HTTP traffic within QGIS and is a valuable tool in debugging failing connections.
Note
An increasing number of GIS Desktop clients add support for OGC API's in subsequent releases. For example ArcGIS Pro supports OGC API - Features since release 2.8.
GDAL/OGR - Advanced
GDAL/OGR provides support for OGC API - Features. This means you can use ogrinfo, ogr2ogr to query and convert data from OGC API - Features endpoints just like any other vector data source. This also means you can make connections to OGC API - Features endpoints from any software which has an interface to GDAL, such as MapServer, GeoServer, Manifold, FME, ArcGIS, etc.
Use OGR to interact with OGC API - Features
- Verify you have a recent GDAL installed, else use GDAL from OSGeoLive
- Run
ogrinfoon the command line to verify a connection to OGC API - Features
Check summary information about the layer with:
Now, let's convert the observations into a shapefile
Note
You can even use OGR to append new features to an OGC API - Features collection which supports transactions. Read more here about support for transactions in pygeoapi.
Use GDAL from the commandline with Docker
If you do not have GDAL installed, or want to use/try another version, you can always run the GDAL Docker image directly from the commandline. OSGeo provides GDAL Docker Images. The main thing to deal with is proper Docker Volume mapping to have GDAL tools access local files. This can be very handy for quick data conversions. Most images also come with GDAL Python bindings.
First you can pull a very small Docker Image:
Then you can run for example OGR command line tools. Base command is docker run -it --rm ghcr.io/osgeo/gdal:alpine-small-latest.
This runs the Docker container interactively (-it) and removes the container on exit (--rm). Below are examples.
Ask GDAL/OGR for available Vector formats:
Get information from a geospatial file. Note the volume mapping: -v $(pwd)/data:/work
to access local files within the Docker container (commands are single-line, broken up for readability).
Convert the GeoJSON file to a GeoPackage (GPKG) with ogr2ogr:
bash
docker run -v ${pwd}/data:/work -it --rm ghcr.io/osgeo/gdal:alpine-small-latest ogr2ogr -f "GPKG" /work/tartu/bathingwater-estonia.gpkg /work/tartu/bathingwater-estonia.geojson
You can also use ogrinfo retrieve information about an OGC API - Features collection. In case you are accessing a local collection, you will need to make sure the container runs on the host network:
OWSLib - Advanced
OWSLib is a Python library to interact with OGC Web Services and supports a number of OGC APIs including OGC API - Features.
This exercise will be done using a jupyter notebook. If you prefer, you can do it using Python from the command line (see bellow).
Before continuing, make sure you are in the workshop/exercises folder. You will need that, to be able to use the jupyter notebook.
Then run a container to start a jupyter notebook, mounting the local folder:
Enter the url stated on the command line, http://127.0.0.1:8888/lab followed by a token. Enter the work folder and open the features-owslib.ipynb.
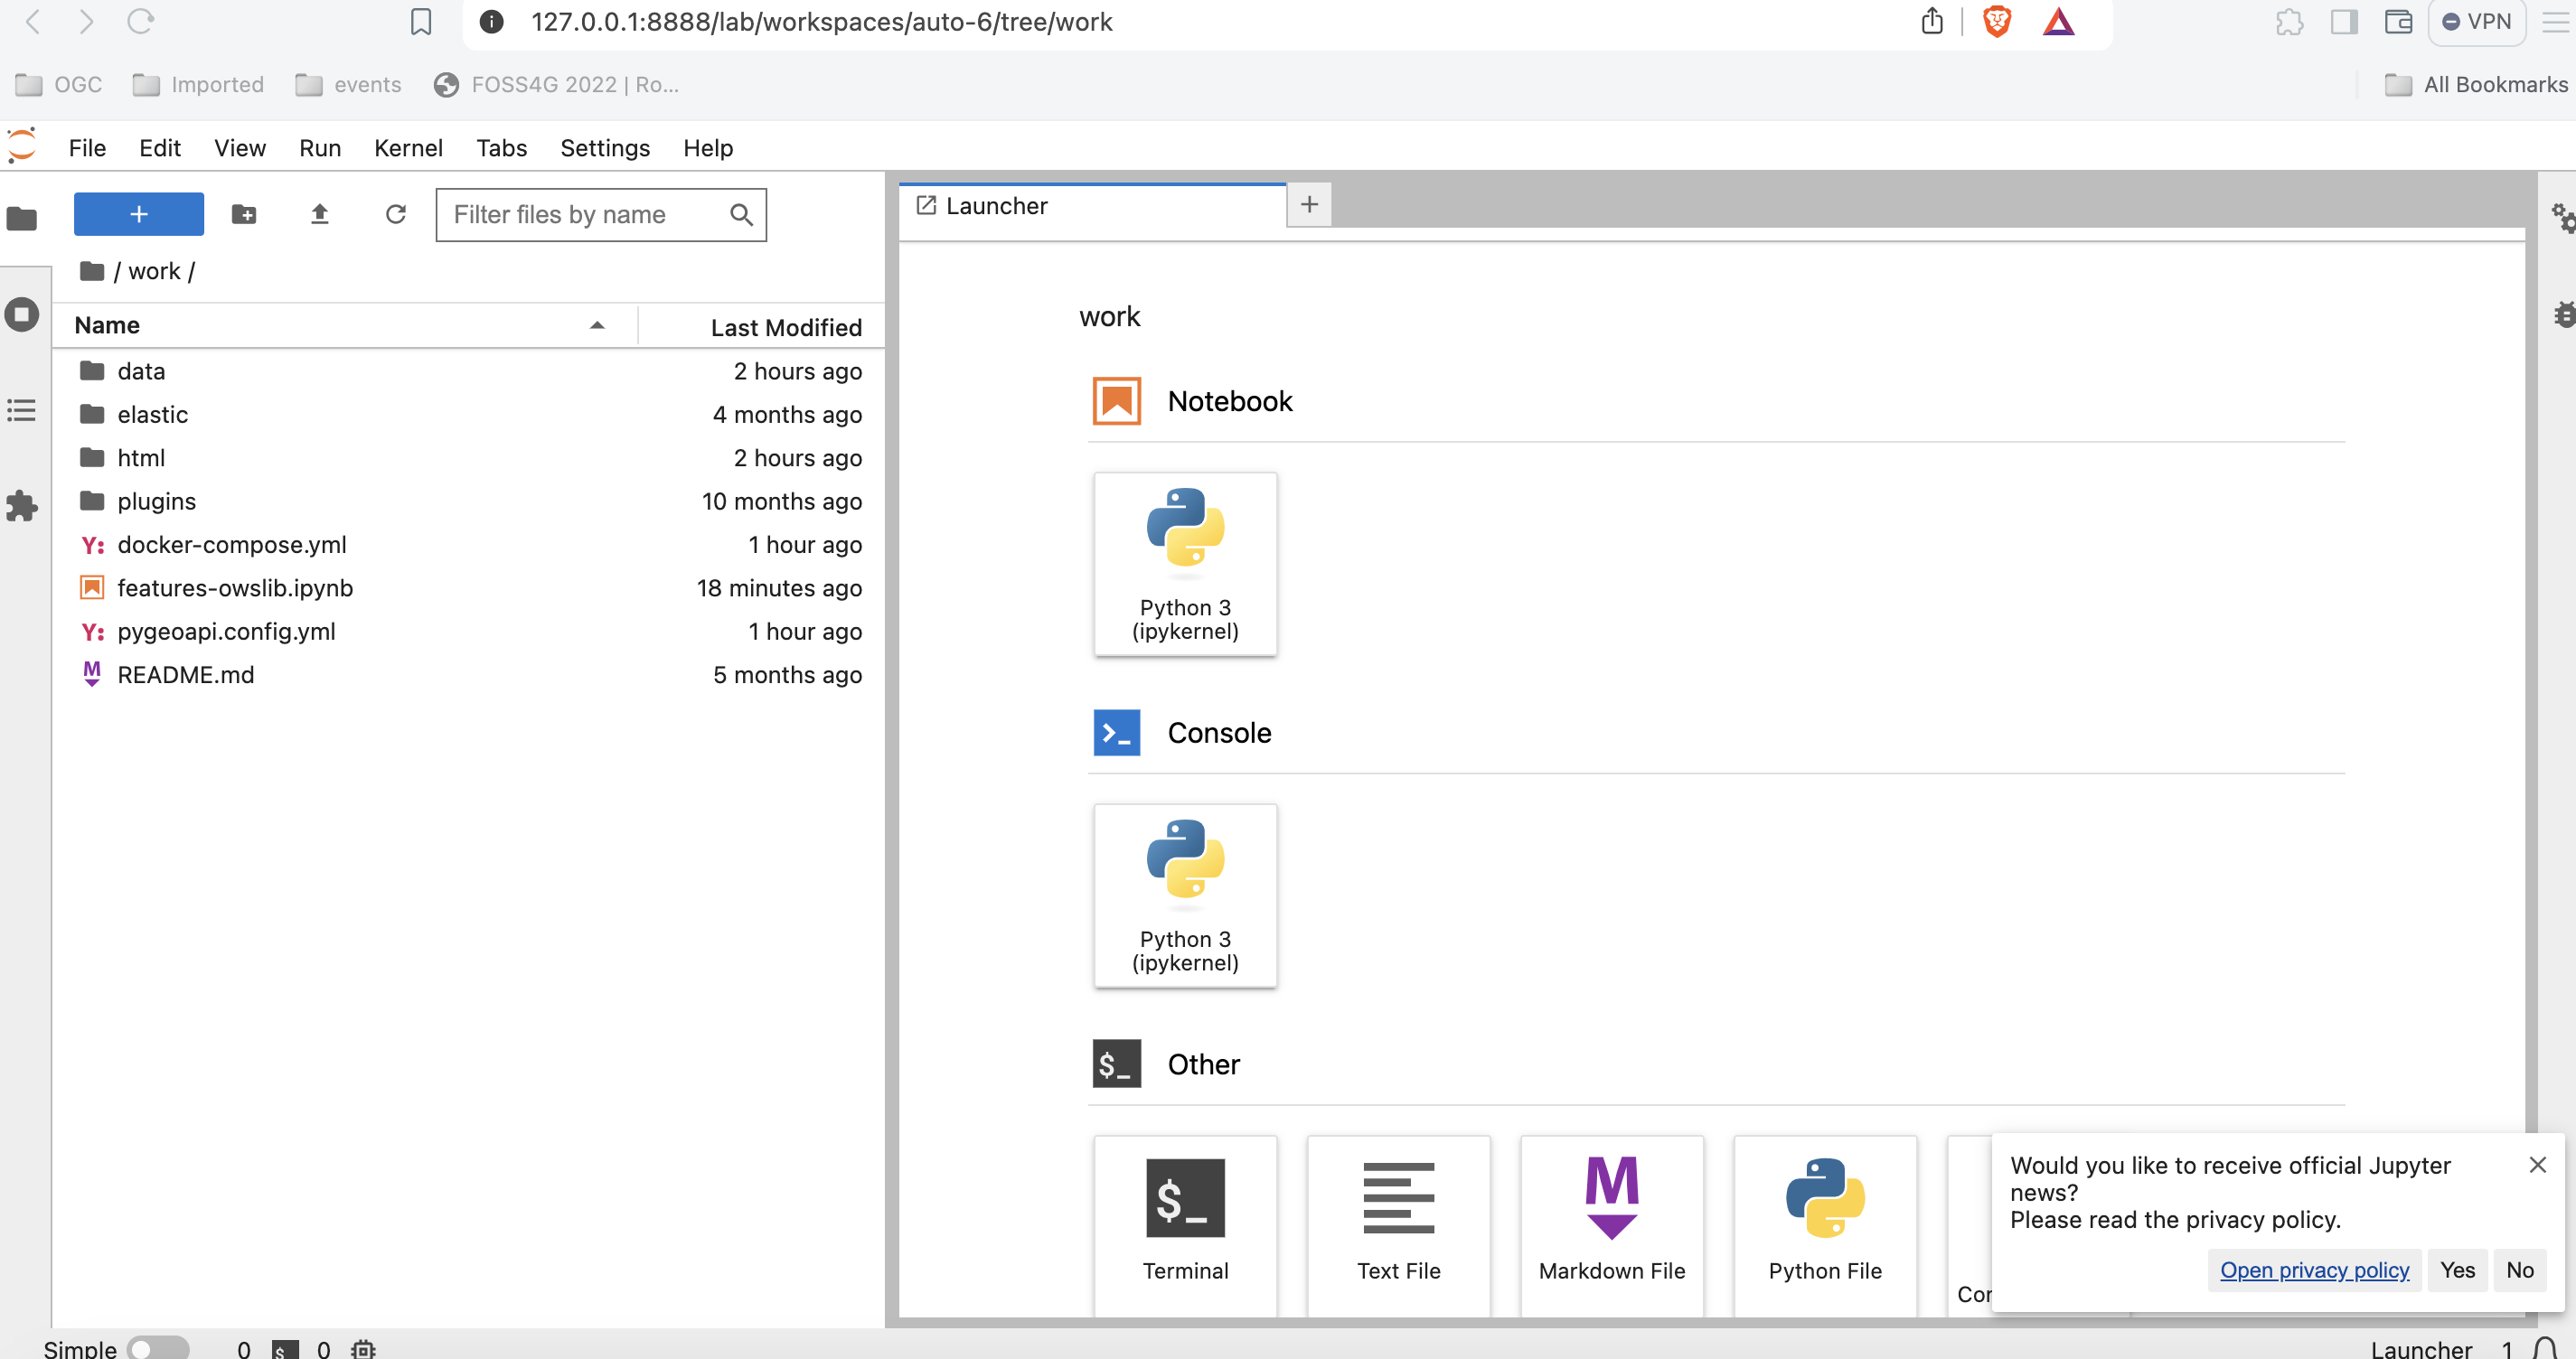
Run through the notebook, to explore an OGC API - Features server, using owslib.
Note
You can run the same instructions using your local pygeoapi server, instead of the demo pygeoapi instance.
Using Python from the command line
Interact with OGC API - Features via OWSLib
If you do not have Python installed, consider running this exercise in a Docker container. See the Setup Chapter.
Then start a Python console session with python3 (stop the session by typing exit()).
>>> from owslib.ogcapi.features import Features
>>> w = Features('https://demo.pygeoapi.io/master')
>>> w.url
'https://demo.pygeoapi.io/master'
>>> conformance = w.conformance()
{u'conformsTo': [u'http://www.opengis.net/spec/ogcapi-features-1/1.0/conf/core', u'http://www.opengis.net/spec/ogcapi-features-1/1.0/conf/oas30', u'http://www.opengis.net/spec/ogcapi-features-1/1.0/conf/html', u'http://www.opengis.net/spec/ogcapi-features-1/1.0/conf/geojson']}
>>> api = w.api()  # OpenAPI document
>>> collections = w.collections()
>>> len(collections['collections'])
13
>>> feature_collections = w.feature_collections()
>>> len(feature_collections)
13
>>> lakes = w.collection('lakes')
>>> lakes['id']
'lakes'
>>> lakes['title']
'Large Lakes'
>>> lakes['description']
'lakes of the world, public domain'
>>> lakes_queryables = w.collection_queryables('lakes')
>>> len(lakes_queryables['properties'])
6
>>> lakes_query = w.collection_items('lakes')
>>> lakes_query['features'][0]['properties']
{u'scalerank': 0, u'name_alt': None, u'admin': None, u'featureclass': u'Lake', u'id': 0, u'name': u'Lake Baikal'}
Note
See the official OWSLib documentation for more examples.
Summary
Congratulations! You are now able to publish vector data with pygeoapi.