Workshop environment setup
In this workshop we use the following materials:
- Documentation - (like this page): access latest on dive.pygeoapi.io
- Exercises - download the latest zip file, unzip, find exercises in
workshop/exercises1 - Docker - all examples/exercises are run in a
Docker containerinworkshop/exercises
Text editor
Your text editor needs to be able to edit configuration files in plain text. Below are some choices for text editors (there may be others), along with what some of the pygeoapi developers prefer to use:
- Notepad or Notepad++ (Windows)
- Sublime Text: Angelos
- PyCharm: Just
- Emacs: Just
- Visual Studio Code: Francesco, Angelos, Joana
vi/vim: Tom, Angelos
Having said this, please feel free to use what works for you :)
YAML
Most exercises will focus on editing the pygeoapi configuration, which is in the YAML format. If you are not familiar with YAML, it is worth reading through a tutorial to become aware of YAML syntax and indentation.
Docker
The main requirement for the training is to install Docker and/with Docker Compose on your system. We strongly advise to install Docker before the workshop starts.
Although several custom installation scenarios are possible (see the documentation for more information), these are not considered in this workshop given the ability to install a fully reproducible environment via Docker and Docker Compose.
Workshop Exercises will also be based on Docker, hence a custom installation would at least be 'challenging'. The good news is that only a single installation (Docker) is needed! The Docker images used in this workshop contain the latest pygeoapi and all its dependencies and external services (e.g. PostGIS).
Docker has been available since 2013, and provided as a deployment option on numerous FOSS software and OSGeo projects. Given the current era of computing, chances are that you have heard of Docker and containerization. Or, perhaps are already familiar and hopefully using Docker already. If not, there is an abundance of introductory materials that can be found online like this tutorial from IBM.
FOSS4G software has benefitted greatly from Docker (consistent packaging, isolation, integration and upgrade patterns) in comparison to custom installations. Though today we mainly use Docker, the bigger picture is the use of Containers as a next step in virtualization. Containerization certainly deserves its own workshop, so for the purpose of this workshop we only cover the basics of Docker and Docker Compose.
Docker Compose is an addition to Docker to facilitate
the orchestration (configuration) of one or more Docker 'Containers' (a Container is a running instance of a Docker image)
using a configuration convention (the Docker Compose YAML file), usually named docker-compose.yml.
Stepping up further are even more sophisticated Docker orchestrators like Rancher and Kubernetes, but for this workshop, Docker and Docker Compose are all we need.
Installation
Docker installation has greatly progressed over the years. This is the only part of the workshop which is dependent on the system/OS you are running (e.g. Windows, Mac or Linux). For each system the Docker website provides detailed installation instructions. Please follow these consistently.
For many platforms a product called Docker Desktop is available, which includes the main Docker components:
- Windows installation
- Mac installation
- Linux installation
Some notes:
- On Windows we recommend using the Windows Subsystem for Linux (WSL) as it also provides a powerful (Bash) command line and has optimal integration with Docker. Before installing Docker Desktop, install WSL by opening Microsoft PowerShell (run as administrator) and running
wsl --install- installing WSL requires administrator privileges on your system
- On Mac, if you are using Homebrew, consider (as the author has) using the brew Docker formula
- On Mac OSX Monterey and later, there may be an issue with local port 5000 already in use, therefore conflicting with the default one used by the pygeoapi container. If you see this error
OSError: [Errno 48] Address already in use, you need to disable the Airplay Receiver. Go toSystem Settings | Sharingor like in Sonoma type 'airplay' in the search box. See image below for Mac OSX Sonoma. Also a detailed description in this blog post.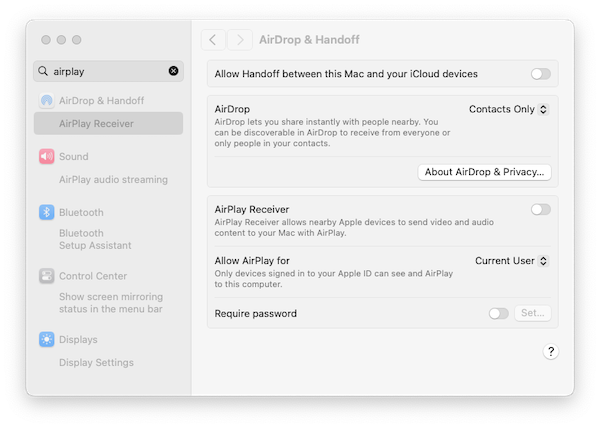
- On Linux, you can choose the relevant installer for your platform. You can also use Virtualbox with a Ubuntu Image or use a cloud VM
- On Linux, when encountering permission issues: the Docker daemon normally runs as "root". This requires prefixing commands with
sudoas a non-root user. On most distributions Docker is accessible by users in thedockergroup. You can omit the use ofsudoand prevent possibly other permission issues as follows:- Test if the
dockergroup exists:cat /etc/group | grep docker. - When non-existing:
sudo groupadd docker. - Add your user to this group:
sudo usermod -aG docker $USER - Log-out and log-in.
- See all details and more options in this instruction.
- Test if the
- Docker Desktop includes a graphical user interface with some interesting options. You can see logs and information about running containers, open their service in a browser or even open a terminal inside the container
If all goes well, you should be able to run Docker from the command line as follows: 2
(It is not required that your version numbers exactly match).
Quickstart
Once Docker is available on your system, running the pygeoapi container with its built-in configuration and data is a one-liner.
Open a terminal session and run:
First run via Docker
docker run --rm -p 5000:80 geopython/pygeoapi:latest
Unable to find image 'geopython/pygeoapi:latest' locally
latest: Pulling from geopython/pygeoapi
d7bfe07ed847: Already exists
d5d0144a7164: Already exists
afe0923a0fa0: Already exists
75f8618c4e86: Already exists
c603397fd6ad: Already exists
6584a95328b3: Already exists
fd93e44631d9: Already exists
6a3201071a5d: Already exists
4f4fb700ef54: Already exists
Digest: sha256:27b2b219497a6ea382a946ee90ae96ad00b5c1d8e9b725fccf23211978fef124
Status: Downloaded newer image for geopython/pygeoapi:latest
START /entrypoint.sh
Trying to generate openapi.yml
openapi.yml generated continue to pygeoapi
make SCRIPT_NAME empty from /
Start gunicorn name=pygeoapi on 0.0.0.0:80 with 4 workers and SCRIPT_NAME=
[2022-08-09 12:59:00 +0000] [1] [INFO] Starting gunicorn 20.0.4
[2022-08-09 12:59:00 +0000] [1] [INFO] Listening at: http://0.0.0.0:80 (1)
[2022-08-09 12:59:00 +0000] [1] [INFO] Using worker: gevent
[2022-08-09 12:59:00 +0000] [18] [INFO] Booting worker with pid: 18
[2022-08-09 12:59:00 +0000] [19] [INFO] Booting worker with pid: 19
[2022-08-09 12:59:00 +0000] [21] [INFO] Booting worker with pid: 21
[2022-08-09 12:59:00 +0000] [22] [INFO] Booting worker with pid: 22
That's all! Open your browser and navigate to http://localhost:5000, the pygeoapi page will display.
As part of the initial docker run, Docker will download the pygeoapi Docker Image from Docker Hub.
This may take some time, as the Docker image includes all dependencies (such as GDAL, etc.). Be patient! This is a one-time download for the entire workshop, or
you may want to do this beforehand.
Some notes:
- Docker runs a pygeoapi container on your local system on port 5000, which is mapped to port 80 inside the container
- the pygeoapi Docker container runs with the default configuration and data from the GitHub repo
- both configuration and data (from GitHub repo) is embedded in the Docker Image - we will override these later
- the
--rmoption removes the Docker Container (but not the image), after execution - type
CTRL-Cto stop the container and return to the terminal
Next, you can override the default configuration and add your own data using Docker volumes.
Customizing configuration
In the upcoming exercises we are going to update the configuration file multiple times.
For ease of development we are overriding the pygeoapi configuration which resides by default at /pygeoapi/local.config.yml
within the container by a local file which you can edit in your favourite text editor.
Override the pygeoapi config file
Download pygeoapi's default Docker configuration from default.config.yml to the current folder (or navigate to the folder where you downloaded the file), for example with:
Open the file in your favourite text editor and change the title and description of the API:
Now run the container with the overridden config file:
At this point, navigate to http://localhost:5000 to verify the new title and description.
Note
On Windows, the file downloaded may be renamed to default.config.yml.txt. Ensure to rename the file to default.config.yml.
By using a Docker volume mount (-v option), Docker attaches or 'mounts' a
directory or single file from your host/local system into the Docker Container.
In the above snippet, $(pwd) indicates the working folder from which you start the Docker container.
Adding data and setting the configuration file
In addition to adapting the configuration you will usually add your own data as files or remote data services like PostGIS or WFS.
You can also mount a local directory such as data/ to /pygeoapi/mydata within the Container.
Within the data directory you can store vector data, raster files or sets of image of vector tiles.
Below is an example where the configuration is explicitly set to pygeoapi-config.yml via an environment variable (-e) and uses a Docker mount to mount the local data folder as /pygeoapi/mydata:
In the next sections we will review additional examples of mounts to the data folder. More Docker deployment examples can be found in the pygeoapi GitHub repository.
Using Docker for Python Clients
In some exercises we access pygeoapi remote endpoints using OWSLib,
a Python library to interact with OGC Web Services. OWSLib can be installed using standard
Python pip3 install OWSLib, but you may not have Python available, or you want to keep your system 'clean'.
As Docker is already available on your system, you can start up a
Container with a complete Python environment, and access it from a bash shell prompt.
The magic line is:
docker run -it --rm --network=host --name owslib python:3.10-slim /bin/bash
This will pull a small (125MB) official Python Docker Image. When the Container is started, you are directed into
a bash session/prompt. The argument --network=host allows you to directly interact with services on your
host system, thus with pygeoapi, without setting up a Docker network. From there you can start python3, install OWSLib and
maybe even other tools like curl and wget.
Below is a complete example, assuming pygeoapi runs on your localhost at port 5000:
docker run -it --rm --network=host --name owslib python:3.10-slim /bin/bash
Unable to find image 'python:3.10-slim' locally
3.10-slim: Pulling from library/python
5b5fe70539cd: Pull complete
f4b0e4004dc0: Pull complete
c5424f0ac885: Pull complete
9d21fe1624ec: Pull complete
de0194aa1c21: Pull complete
Digest: sha256:7dc5b4e948acd18c1633b0e593ad0224298646612ce7d0b5ac6d4e17616d7e4b
Status: Downloaded newer image for python:3.10-slim

root@docker-desktop:/# pip3 install owslib
root@docker-desktop:/# python3
>>> from owslib.ogcapi.features import Features
>>> w = Features('http://localhost:5000')
>>> w
<owslib.ogcapi.features.Features object at 0x7ff493e6f850>
>>> conformance = w.conformance()
>>> conformance
etc
We will refer to this installation in some of the Exercises where OWSLib is used.
-
Alternatively, you can fork/clone the GitHub repository of this workshop directly from https://github.com/geopython/diving-into-pygeoapi. ↩
-
For recent version of Docker run
docker compose version↩